Articles tagged with 'TrialGrid'

Standards Compliance for Study Builders

In my last post I explained some of the standards compliance and comparison features in TrialGrid. Being able to determine compliance in a report is very useful but what about the Study Builder? How does a Study Builder know, during the setup of a Form, what the Standard allows to be changed and what must be preserved exactly the same as the Standard Object in order to maintain compliance?

In TrialGrid we present this information to the Study Builder in several ways so that they can build Forms compliant from the start.

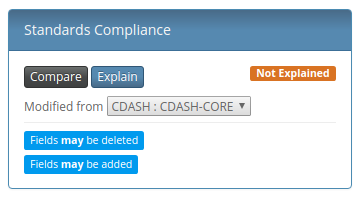
First, the Form displays a Standards Compliance summary area which shows whether Fields can be added to the Form or Fields can be deleted.

Compliance Summary

This summary is updated as the Form is saved so that the Study Builder can always see whether the Form they are working on is currently in a state of Matched (exactly the same as the standard), Modified (allowed changes have been made) or Not Explained (non-allowed changes made).

Secondly, changes which are allowed to individual properties of the Form or of any Field are marked with a pencil icon as shown here on the Name property:

Name Field

The pencil icon signals that this property may be changed without breaking standards compliance.

Finally, although the Standard Form may allow some Fields to be deleted there may be other Fields which are Required and so cannot be deleted. These are marked in the Fields list with a "STD. Required" label:

Required Field

Deleting a Required Field will mark the Form as non-compliant to the standard.

Our goal with TrialGrid is to bring activities like standards compliance checking into the study build workflow so that non-conformances can be explained and addressed as early in the process as possible. Just one of the ways that TrialGrid makes life better for Study Builders.

Standards Compliance

Standard Libraries. The concept is straightforward; A Standard Library is a set of Forms, Data Dictionaries, Edit Checks and other study design elements which can be used as building-blocks to assemble an EDC study design. Using a Standard Library should increase efficiency, eliminate variation, reduce study build times and therefore reduce cost. The reality is not always so straightforward. Standard Libraries require maintenance and they require enforcement to ensure that they are being used correctly and these activities are not free. For CRO's providing EDC study build services where every client Sponsor has one or more Standard Libraries, managing compliance can be a major challenge.

Medidata Rave Architect provides Global Libraries to organize standard design objects and a Copy Wizard to quickly pull those objects into a study design. These are useful tools for the Study Builder but really only cover the initial phase of study build. Lets look at an example of Standards in action to see how TrialGrid extends the capabilities of Rave Architect to support the use of standards through the entire study build.

A Standard Form

We'll start with an example standard Form, loosely based on the CDISC Demography Form. Here is the design of the form in Architect.
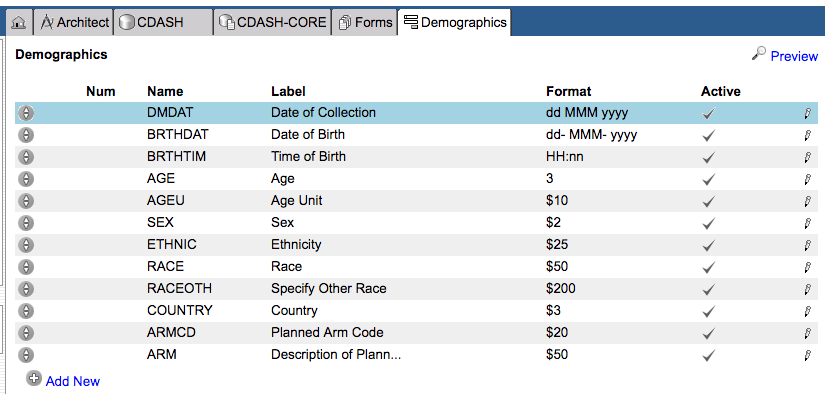
Form Design

This is the Form definition which is copied into a new study.

Changes to the Standard Form

In many cases a "Standard Form" will have some allowed changes. Some Fields may be optional, some Properties of Fields such as their Labels or Help text, may be allowed to be changed. Making these changes may not be considered a deviation from the Standard.

The following changes are made to the Standard Form by our Study Builder:

  • The Time of Birth field is made inactive (invisible, not collected)
  • The Sex field is moved down the field order so that it appears after Race
  • Planned Arm Code and Arm are removed altogether from the form
  • The field label for Date Of Birth is changed to "Birth Date"
  • A new field, RELSTAT : Self-reported relationship status, is added to the Form

It now looks like this (changes highlighted):
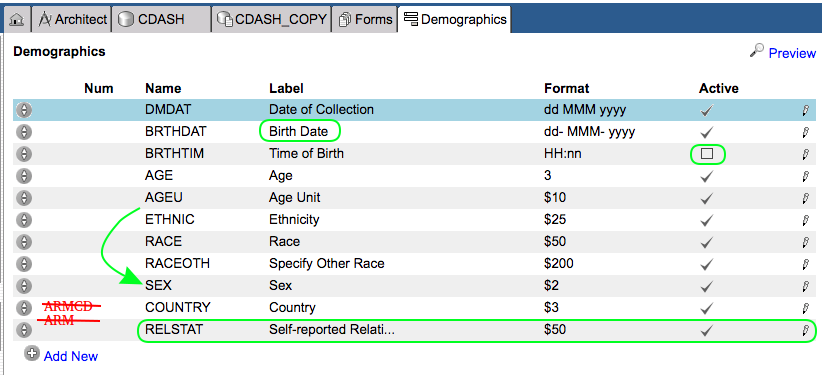
Form Design

Challenges

The challenge for the Standards Manager and for the Study Builder is to determine if the changes that have been made to this Form make it non-compliant. The Rave Architect Global Library stores the original Form and Architect provides a difference report which can help to determine the differences between the Form as pulled from the library and as-modified in the study:
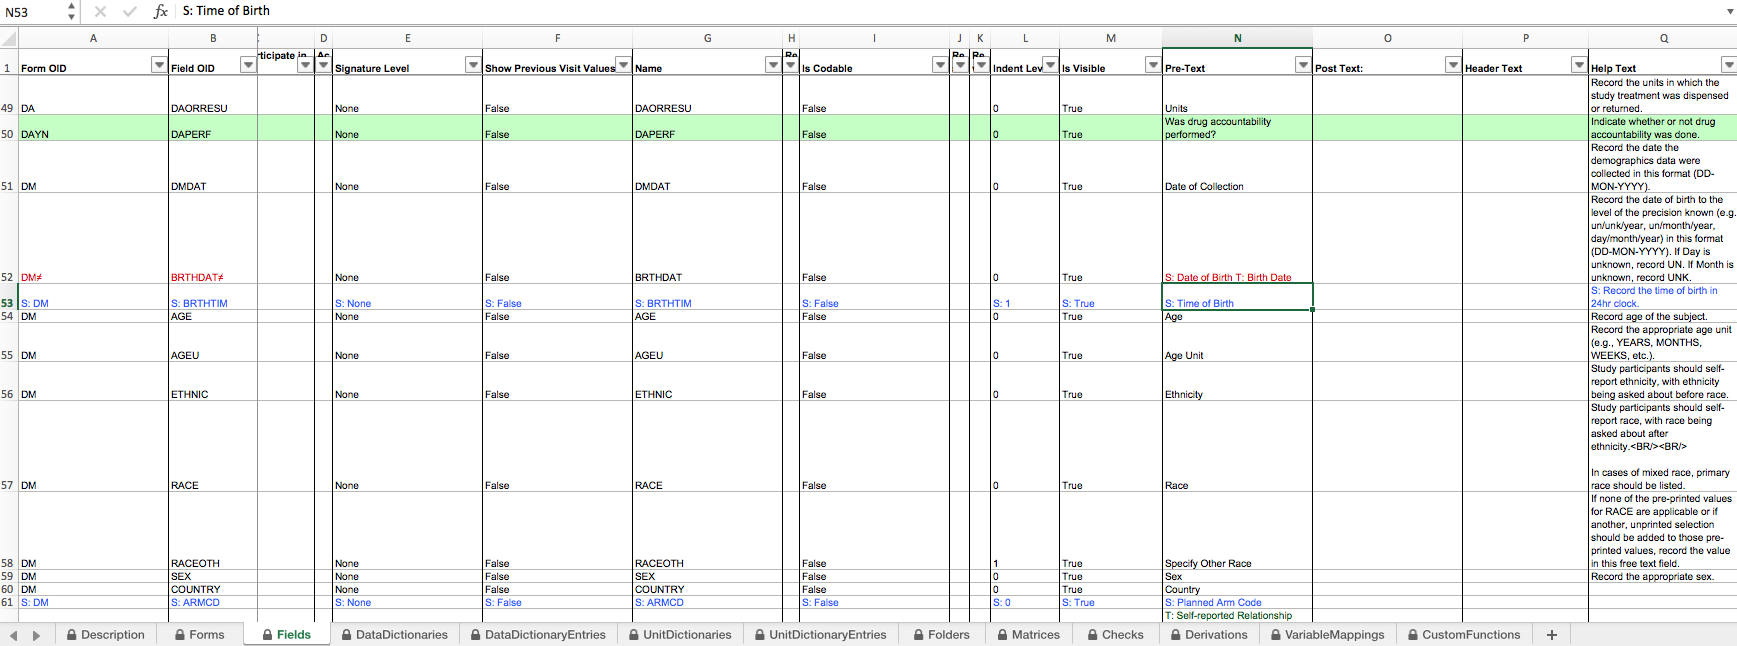
Difference report

The color coding shows that changes have been made to the Fields of the DM Form but it is difficult to read in the spreadsheet format and Architect doesn't have any concept of what changes are allowed to a Form or to Field properties so cannot be any help in determining if these changes are OK (compliant with Standard) or not (non-compliant).

If your process requires these kinds of changes to be reviewed by a Standards Manager or otherwise compared against a set of written rules for the use of the Standard this can become a very time-consuming activity, stretching timelines and increasing costs.

The TrialGrid way

TrialGrid is a system that brings together Standards Compliance, Study Design and Quality checking into a single integrated environment. So how does it manage the Standards Compliance workflow?

First we'd import both the Global Library Draft and the Study Draft into TrialGrid. It takes about 30 seconds to download an Architect Loader Spreadsheet from Rave Architect and about 30 seconds to load one into TrialGrid. In two minutes we can have the library and study draft uploaded into the system.

Next we mark the Global Library Draft as a Library and we link the Study Draft to it, actions that take about 5 seconds to perform.

Immediately the Form list shows that the DM form has been modified from the standard and that the changes are unexplained:

TG Form List

So what are those differences? Click the Compare button to find out:
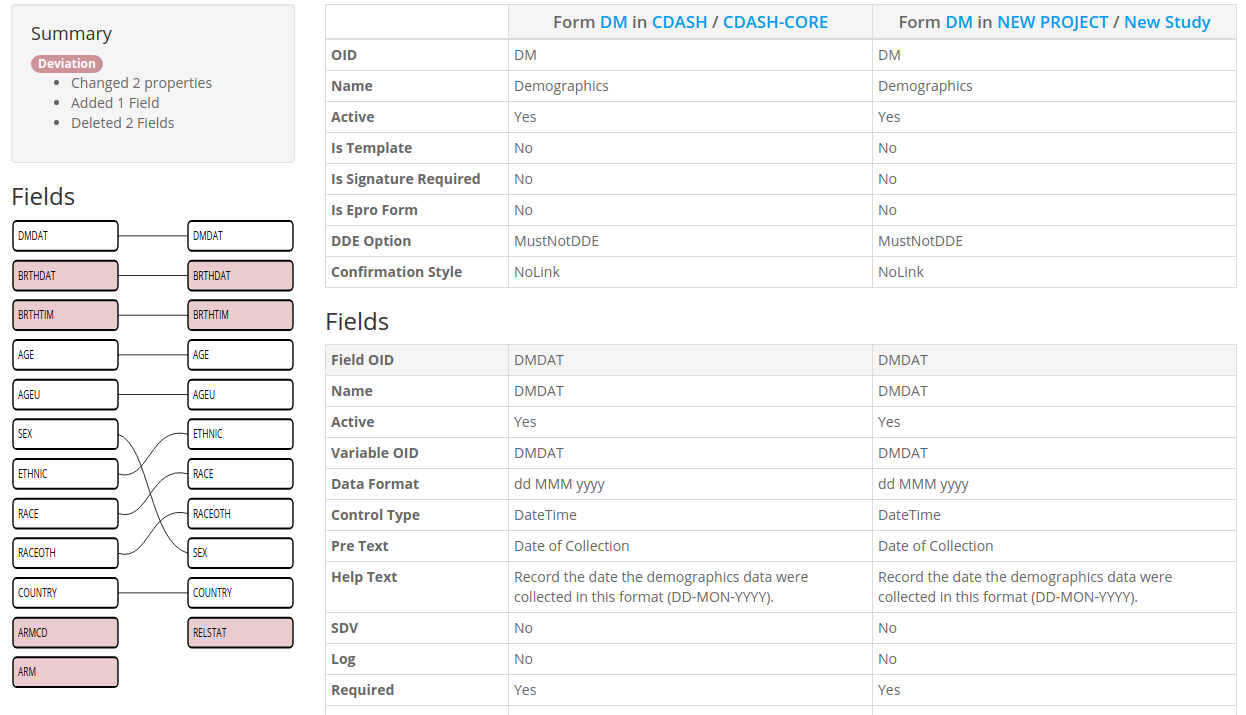
TG Compare

In the top left we see a summary of the changes which tells us which changes, if any, are deviations from the Standard. Below is a graphical representation of the Fields of the Form with the Standard on the left and the current Form on the right. Changes are colored in Red and lines between the Fields show how they match up. We can quickly see which Fields have changed and which have no equivalent between the Standard and the New. Fields which have been moved in the order are also clear to see, we can see that SEX has been moved down below RACEOTH in the new Form.

Clicking on any of the Field boxes takes the user to the Properties with any changes highlighted.

TG Property Change

Allowed Changes

So far we have demonstrated that TrialGrid makes comparisons between objects easier but what about Allowed changes?

In order to set that up we need to navigate to the Standard Form. Here we can select the Standards Control tab and set some global options for the Form. In this case we're saying that the Form Help Property can be changed and that Fields may be Removed and that Fields may be added.

TG Form Standards

But there are some Fields we do not want to be removed such as Date of Birth. We can override this option for the Date of Birth Field. If our standard allows it we can also select properties which are allowed to be changed. Here we select "Pre Text" (the question label) as an allowed change and mark the field as Required by the Standard.

TG Form Standards

Finally, for Time of Birth we can allow the Active property to be changed (not shown in screenshot).

Now when we return to the Comparison view we see that all our changes are now shown in green.
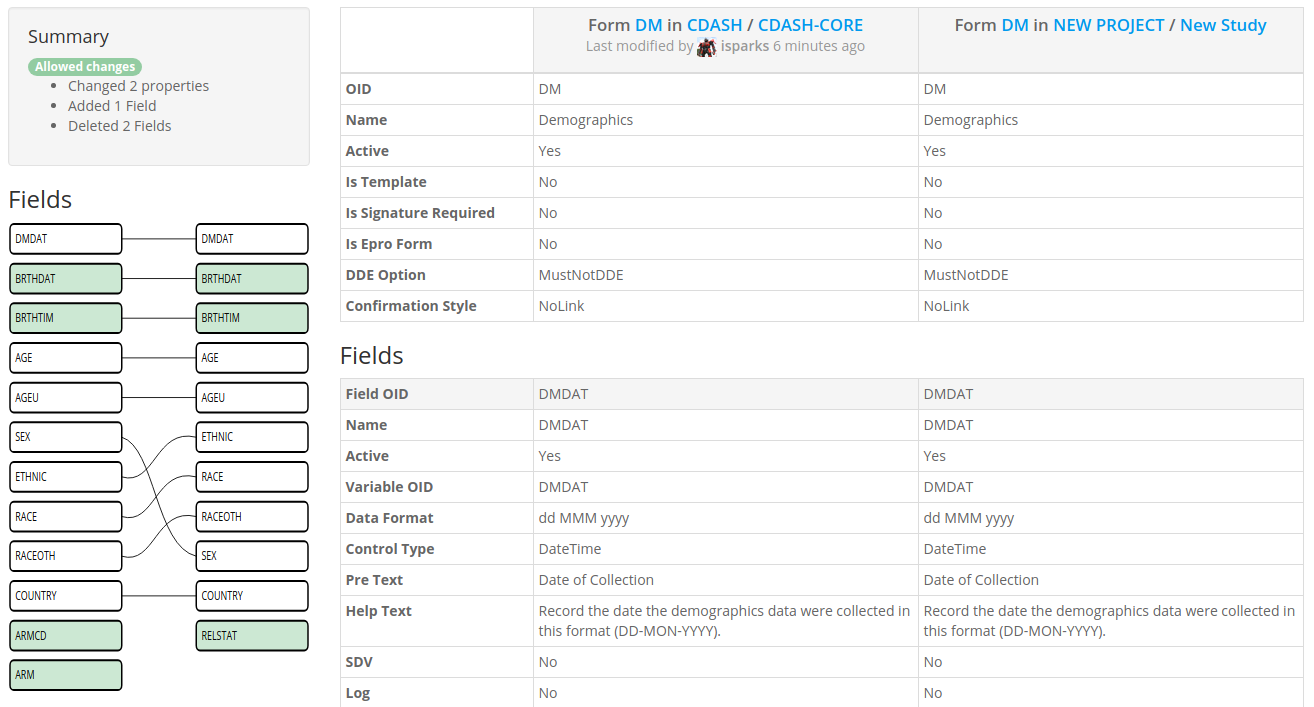
TG Compare Again

If you recall from the start our changes were:

  • The Time of Birth field is made inactive (invisible, not collected) - Made an allowed change to the Active Property to this field.
  • The Sex field is moved down the field order so that it appears after Race - Shown in the comparison (allowed by default)
  • Planned Arm Code and Arm are removed altogether from the form - Form allows fields to be removed (unless they are marked required)
  • The field label for Date Of Birth is changed to "Birth Date" - Field allows changes to the Pre-Text property so this is now OK
  • A new field, RELSTAT : Self-reported relationship status, is added to the Form - Form allows additional Fields to be added so this is now OK.

Summary

The goal of this post was to demonstrate how the Standards Compliance features of TrialGrid assist study teams in tracking compliance without having to use the Architect Difference Report. The Allowed Changes feature reduces the workload on the Standards Manager or Global Librarian so that they do not have to manually review and approve every tiny change to any element of a Standard Form.

There was no space in this post to go through the workflow for Standards Compliance approval requests and the reporting aspects of this feature, I'll save that for a future post. If you are interested in seeing more of this feature, please contact us.
Image

This week at TrialGrid (Feb 24, 2017)

One of the things that makes writing software for the clinical trials market different to writing software for, say, the consumer market is the need to Validate the product. I write it in scary bold font because I think this requirement does deter would-be startup founders in our industry. So how are we building software at TrialGrid in a way that meets these requirements?

First of all, there is a fundamental difference between Validated software and software that has been developed using best practice. Validated software is software that has been developed within the guiding framework of a Quality Management System (QMS). The QMS describes what you do and how you do it. An Auditor (internal or external) will compare your documented procedures to evidence that you followed the procedures.

Developing a QMS is beyond the scope of a blog post but I want to give you an overview of our process for creating quality software while collecting our documented evidence that we're following procedures.

Activities and Evidence

Imagine I am a TrialGrid programmer. I have received a requirement and I have written some code to meet that requirement so now I want my code merged into the master copy of the product so that it can be made available to my customers.

Here are the steps that have to be covered under our process:

1. Code Review (Manual)

First I need my code peer-reviewed. Have I missed anything? Is there a better (more efficient, clearer) way to implement the feature. Does the peer understand the code well enough to maintain it in the future? The output of this step will be documented evidence of review, comments and perhaps suggestions on changes to the code. If changes are needed the cycle starts again. We do this code review in our source code control system, so that we have evidence of who proposed the code, who reviewed it and what their review comments were. The source code control system is set up so that any comments must be resolved (answered by explanation or change to the code) before the code can go on.

2. Coding Standards Check (Automated)

Every company has a set of coding standards which dictate how code should be written and formatted. A lot of time can be spent arguing the merits of one style over another so to avoid that we have an independent arbiter, a code compliance checking software robot that enforces our preferred style. If the submitted code doesn't make the grade then "No Soup for you!" and it is rejected. The output of this step is evidence that the checker was run and any findings it reports.

3. Complexity Testing (WIP, Automated)

This one is a work in progress. Code should be understandable. That means that we should have code units with a clear purpose, ideally performing just one function. A complexity measurement examines the code to determine how many logical paths there are through that code. Thomas McCabe wrote a paper defining a logical score. He says a complexity score of 10 is a good (but not magical) upper limit. We currently have 37 functions in our 23,000 lines of code with a score greater than 10. Our worst case has a score of 42. That represents our high bound. Once we have simplified that code and reduced its score we'll set the threshold to our next highest with the goal of getting to a max of 10. Any code over the limit is rejected. As before, the output of this step is evidence that the checker was run and any findings it reports.

4. Unit/Integration Testing (Automated)

We have a simple rule. If you write code, you write a unit/integration test to prove that it does what was intended. This is enforced through running unit tests with a code-coverage tool. Code-coverage checks to see that every logical path of the code has been exercised. We have a 95% threshold (100% unit test coverage is not usually regarded as being useful - you end up writing tests just to achieve coverage rather than helping ensure the code works as intended). As I write, our coverage figure is 97% with more than 1,200 - one thousand, two hundred - unit tests. If code coverage falls below that threshold the code is rejected. The evidence from this step is a detailed report and a set of hyperlinked pages of the code which show the coverage for each file and line individually.

5. Requirements Testing (Automated)

Our Unit and Integration tests are code-based tests, code checking code but we need to provide traceability between user requirements, tests that show those requirements are met and evidence that the tests have been executed. I remember one company I worked for recording videos of testers running through manual tests scripts. Happily those days are behind us. We write requirements in a fixed style:

 1
 2
 3
 4
 5
 6
 7
 8
 9
10
11
12
13
Feature: Login
    As a security auditor I want to be sure that logins to the system are secure
    so that I have assurance that the system is not inappropriately accessed

    Background: Test Setup
        Given a user exists with username "login_test" and password "password1234"

    Scenario: Failed Login due to bad password
        When I visit the login page
        And I enter "login_test" as my username
        And I enter "BADPASSWORD" as my password
        And I try to log in
        Then I should see "Please enter a correct username and password. Note that both fields may be case-sensitive."

the steps of these tests are then automated, another software robot driving a web browser (quite eerie to watch) clicking through the application, checking what it sees on the screen (by examining the HTML content of the pages) and taking evidence screenshots. The output of this step is a set of detailed logs showing which steps passed (or failed) and a set of evidence screenshots which are later packaged into the Validation Evidence Package (see later). Of course, if any step fails here, we're back to the beginning.

6. Documentation Review (Automated)

TrialGrid isn't just code, it's also online help. When you write a new feature you write the help that goes along with it. This is reviewed in Step 1 but there's an (automated) process of assembling the individual help pages into a hyperlinked website. Cross-links are checked and if there are any problems (missing pages, bad links) the build process fails and we start again from Step 1.

7. License Checks (Automated)

Modern software is built on a foundation of libraries. For instance, to read a SpreadSheetML file I don't want to have to write a general-purpose XML parser, I'll use an Open Source one or license a commercial product that someone else has written. Package managers make adding Open Source libraries to a project very easy. As part of the documentation and build system we have a requirements file that lists our required libraries and their versions:

1
2
3
4
5
6
7
8
amqp==1.4.9
anyjson==0.3.3
appdirs==1.4.0
asgi-redis==1.0.0
asgiref==1.0.0
attrs==16.3.0
autobahn==0.17.1
...

But not all Open Source licenses are created equal. Some do not permit use in Commercial Products like ours. As you can see from that list, there is no licensing information there. To protect ourselves and our clients we need that so we have a step in our pipeline that uses an API to pull information about these packages from their setup manifests. Most packages list their license (MIT, BSD, etc) and we compare these to a list of pre-approved licenses. Some don't list their license and in that case the system warns us so that we can manually review. It might take some internet searching to find those packages and we can add them to an exclusion list of manual approvals. Note that we pin to exact versions like amqp==1.4.9 if this library changes to version 1.5.0 and we just automatically upgraded we might find that the license changed between versions. At the moment this tool does not reject code that makes use of non-approved or not-found licenses but it already gives us early warning if unapproved libraries are sneaking in so we can find or write alternatives. The output of this stage is a compliance report which goes into the Validation Evidence Package.

8. Create Validation Evidence Package (Automated)

The final step of the process is the generation of a Validation Evidence Package. This gathers up all the evidence that was generated in the previous steps into a set of hyperlinked documents so that Auditors who want to review our evidence can browse our license management, unit test, code coverage and requirements test evidence in a single place. Once generated this file is automatically packaged up and retained in our build system.

Summary

We didn't invent Continuous Integration (automatic running of tests on checked-in code) and many of the steps I describe are performed routinely by other companies as part of best practice. Nor is this list comprehensive, to get to production the code would have to go through Installation Qualification (IQ) and Operational Qualification (OQ) steps. I think we are unusual in being so rigorous at such an early stage of our company life and in our drive to automate so much of the process. We pay a price for that rigor, it is very annoying to have a build fail because we failed to put an opening brace in the correct place but we think the long-term benefits are worth it.